Qt-like Widgets and Signals
Let’s play ball
In CuteFront, there is only plain html and javascript.
Each widget class is in a separate .js file, while instantiation and signal connections
are created in the html file.
A code example tells more than thousand explanatory words, so let’s get straight to it with some javascript:
import { BallPlayer, BillBoard } from './ballplayer.js';
var alex = new BallPlayer("alex");
var bob = new BallPlayer("bob");
var billboard = new BillBoard("billboard")

// ball from alex to bob
alex.signals.throw_ball.connect(() => {
    bob.catch_ball_slot()
})
// ball from bob to alex
bob.signals.throw_ball.connect(() => {
    alex.catch_ball_slot()
})
// inform billboard about the game
// alex throws
alex.signals.throw_ball.connect(() => {
    billboard.ball_throw_slot()
})
// bob throws
bob.signals.throw_ball.connect(() => {
    billboard.ball_throw_slot()
})

// give ball initially to alex
alex.catch_ball_slot()
Here we have instantiated two widgets, namely, Bob
and Alex, from the same widget class BallPlayer. There’s yet another widget
instantiated, billboard from the class Billboard that reports the ballgame
between alex and bob.
Widget classes are read from separate .js files from a widget library.
Signals from Bob and Alex are connected to the slot of the other player and also to the billboard so that it gets updated: the callback chains become obvious and easy to read, thanks to the signal/slot syntax.
The html part (in the same file), looks like this:
<div id="alex"></div>
<div id="bob"></div>
<div id="billboard"></div>
Quite simple, right? No templating languages or obscure onclick callbacks to- and fro
between html and javascript.
Only the basic layout is described by html, while all other complex / interactive stuff
is implemented by the widget code. Note how we “hooked” into the <div> elements
in the JS part by using their unique id.
Here is an image of the working web-page:
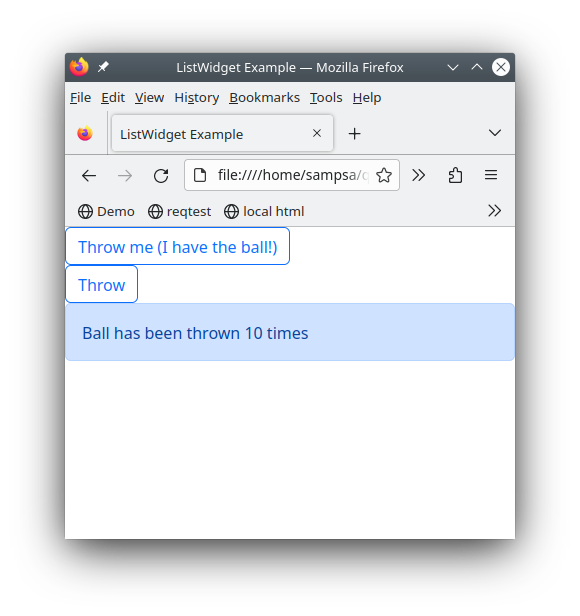
You can also try it on-line in here
About the State
Before continuying, let’s still comment about the “state” (the set of all variables) of the page:
Each widget from the
BallPlayerclass knows it’s own state (has the ball or not).The widget from the
Billboardclass, similarly, knows only the relevant part of the state: how many times the ball has been thrown around.
In other words, the global state has been “partitioned” and cached into the widgets. You can contrast this to, for example to Vue’s “vuex” and similar architectures, where the state variables become, in practice, global variables (like in 80’s style programming). Again, in Vue, it becomes even more nastier when those global variables are “reactive” and change sneakily other variables in the global state (and the page’s behaviour).
Let’s emphasize the philosophy of handling the state in CuteFront:
Each widget caches it’s own part of the global state
Furthermore, signal/slot paradigm can naturally be represented as a graph, so let’s do some ascii art:
BallPlayer
    sig: throw_ball  >------+-----+
    slot: catch_ball <--+   |     |
                        |   |     +---> Billboard
BallPlayer              |   |     |
    sig: throw_ball  >--+---|-----+
    slot: catch_ball <------+
A more complicated topic on the state is the “state history”, i.e. moving forward and backward in history, using browser forward and backward buttons. You can read more about that in State History.
Anatomy of a Widget
Let’s take a look at the BallPlayer widget class:
class BallPlayer extends Widget { /*//DOC
    An widget that has a button to throw the ball and a text indicating if this widget has the ball
    or not
    */
    constructor(id) {
        super();
        this.id = id;
        this.createElement();
        this.createState();
    }
    createSignals() {
        this.signals.throw_ball = new Signal("Sends the ball to another widget");
    }
    catch_ball_slot() { /*//DOC
        Sending a signal to this slot, gives the ball to this widget
        */
        this.log(-1, "catch_ball_slot")
        this.has_ball = true
        this.setBall()
    }
    createState() {
        if (this.element == null) {
            this.err("no html element")
            return
        }
        this.has_ball = false // the only state variable
        this.setBall() // initialize to not having a ball
    }
    createElement() {
        this.element = document.getElementById(this.id)
        if (this.element == null) {
            this.err("could not find element with id", this.id)
            return
        }
        this.element.innerHTML=`
        <button class="btn btn-outline-primary">Throw</button>
        `
        this.button=this.element.getElementsByTagName("button").item(0)
        this.button.onclick = (event) => {
            this.throwBall()
        }
    }
    throwBall() {
        if (!this.has_ball) {
            // we don't have the ball..
            return
        }
        this.has_ball = false
        this.setBall()
        this.signals.throw_ball.emit()
    }
    setBall() { // changes html element appearance according this.has_ball
        if (this.has_ball) {
            this.button.innerHTML=`Throw me (I have the ball!)`
            this.button.className="btn btn-outline-primary"
        }
        else {
            this.button.innerHTML=`Throw`
            this.button.className="btn btn-outline-primary"
        }
    }

} // BallPlayer
All widgets define createSignals, createState and createElement methods.
createSignalsdefines the signals this widget emits.createStatedescribes the internal state variables of the widget.createElementhooks into the html code and gets an element handle to the widget’s html element. It then produces dynamically all the html code required by the widget and hooks into relevant DOM elements that are used by the widget (for more aboutcreateElement, see here).Slots methods have names ending in
_slot. This is where the signals from other widgets are connected to.
Lets state this formally:
Widgets have an internal state (created initially by
createState)That internal state can be modified by calling their slots (typically triggered by signals from other widgets)
The change in the internal state can result in visual changes of the widget
The change in the internal state can result in the widget emitting a signal (which is connected to other widgets)
Taking a look into createSignals and the _slot methods, we can see at a single glance the API of the widget.
Before going full throttle into creating your own interative pages and widgets, please look at the Creating Widgets section for common techniques and pitfalls.